Stripe Merchant Credentials setup
Log in to Stripe https://dashboard.stripe.com/
- Select Test mode ONLY is you wish to use Stripe with test cards. This would mean the Environment on the Merchant Facility would be set to Sandbox. If you are looking to go live DO NOT set Test Mode on.
- In the Search Box, type “api keys”
- Select “Developer > API Keys”

- Click on Developers (1), Then API Keys Tab (2)
- There is a Publishable Key that is visible and will be copied into the “Payment Gateway UserId” field on the Merchant Facility.
- The Secret key may not be visible - Click the Reveal live key token tab.
Copy this value to the “Payment Gateway Password” field on the Merchant Facility.

In Salesforce, return to the Merchant Facility.
To locate the Merchant Facility:
- In Classic, click on the "+" at the end of tabs. Click into the Merchant Facility. Press GO button and edit.
- In Lightning, click on the nine dots (top left). Click into the Merchant Facility. Select All from the filter option. Click into and edit.
- Select Stripe in the Payment Gateway field (1). If it is not available, it will needed to be added - See upgrade notes 6.1/6.2 if it has not been updated. Copy the Publishable Key into the UserID field. Copy the Secret Key into the Payment Gateway Password field.
- Enter the Publisher Key (copied above) into the Payment Gateway UserId field (2)
- Enter the Secret Key (copied above) into the Payment Gateway Password Field (3)
- Change the Default payment Form to Modern.
- Click into Payment Gateway Metadata and select any field that are required.

Stripe Webhook Setup
Webhooks provide the ability to further ensure the transactions status is correctly stored in Salesforce. They are also used to update Metadata elements to enable reporting in Stripe.
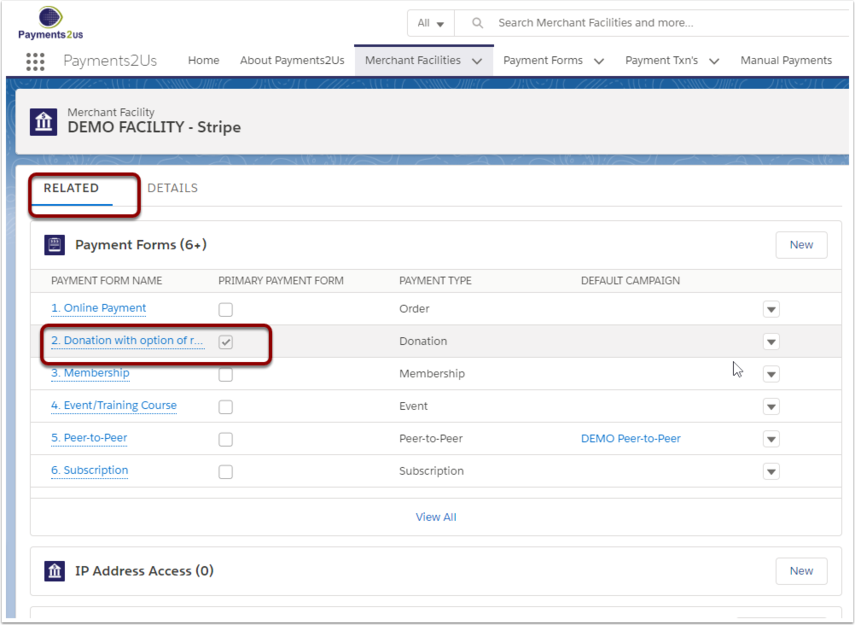
- Login to Salesforce and click Merchant Facilities from the top menu
- Select the Merchant Facility and scroll down to the Payment Forms
- Click the primary Payment Form name from the related list (Do not click edit next to the name).
We recommend using Payments2Us exclusively with your Stripe account. If you have other platforms also using stripe, e.g. and online Shopping Cart, then we suggest creating a new Stripe Account and then linking them together through the Stripe Admin.
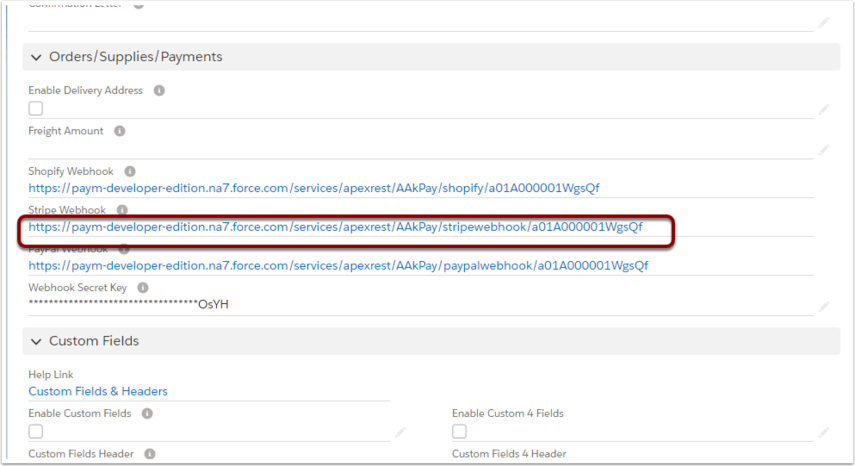
- Scroll to Orders/Supplies group and copy the link from the Stripe Webhook field.
Note: If the field does not appear on the Payment Form, edit layout and add the Stripe Webhook field.You only need to associate the Stripe webhook with ONE Payment Form. This must be a Payment Form linked to your live/production Merchant Facility and ideally the primary Payment Form. If the primary Payment Form is being used elsewhere for a webhook (eg. Shopify or PayPal Recurring webhooks), then any other Payment Form linked to the live/production merchant facility will work.
- Log in to Stripe https://dashboard.stripe.com/
- Select the correct account from the top left hand menu (1)
If you are using Sandbox or test cards/Testing, make sure "Test Mode" (2) is enabled
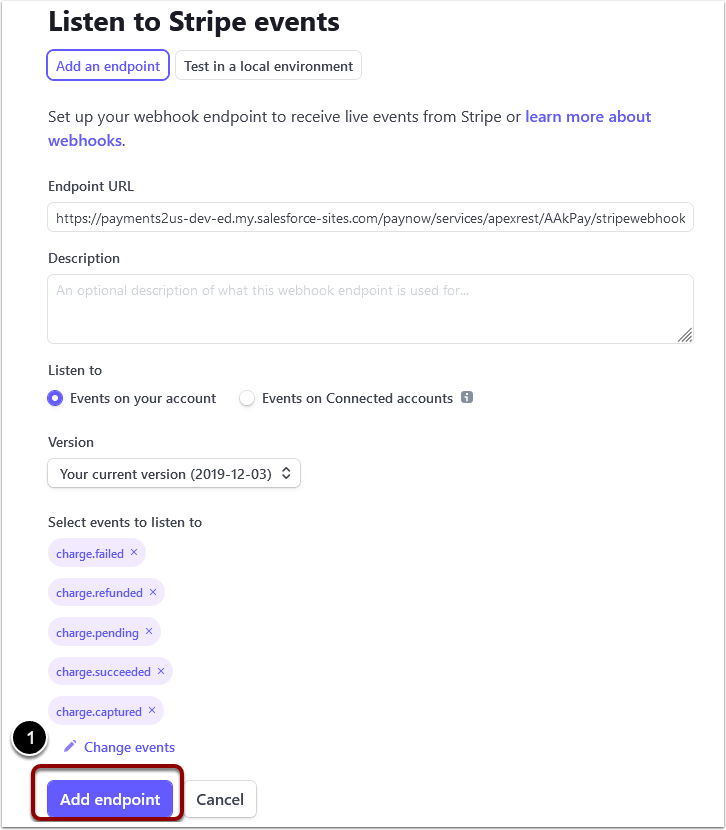
- In the Search box (1), type “Webhook”, then select “Developers > Webhook” (2)

8. Then select “Create an event Destination”

9. Paste the Stripe Webhook link (1) from Salesforce in Step 4. Press "+ Select Events" button (2)
Select Select types to send (2) - and select the type you require.

Expand Charge (1), select the events listed below (2) and Add Events button (3)
Select the following events:
- charge.captured
- charge.failed
- charge.pending
- charge.refunded
- charge.succeeded
- charge.dispute.closed (Only add if you want to create payment txns for disputes)
- payment_intent.payment_failed
- payment_intent.succeeded
- payment_intent.processing
Do NOT select charged.updated. This can caused an endless Webhook update loop.
- Press Add Endpoint button (1)
Stripe is now available as a payment gateway option for Payments 2 Us. Follow these steps for setting up Salesforce Webhook in Stripe and adding the Stripe credentials in Salesforce.

Secret Key Setup
- Click into the webhook added

- Click "Reveal" for Secret Signing
- DO - Reveal Secret Key
- Do NOT copy the webhook reference.

- Copy Secret
- Paste key into Webhook Secret Key
In Salesforce, navigate back to the Payment Form in Step 4 in the Stripe Webhook Setup section of this guide.

Stripe Custom Meta Data
Stripe allows you to store custom meta data in Stripe Dashboard for reporting.
To set this up in Payments2Us, you must have the Webhook setup (as in preceding Step) and then select the items you wish to send over to Stripe Custom Meta Data in the "Gateway Metadata" field on the Merchant Facility.

1. Adding your own fields to send as custom Meta Data
In the screenshot above, you can see the field (1) "Play Date[AAkPay__Transaction_Date__c]" field has been added.
The value before the [] will be used as the Metadata label in Stripe. In the example field, this is "Play Date"
The value that is sent over is the Payment Txn object, field between the []. In the example, this will be the field with the api name of "AAkPay__Transaction_Date__c".
You can use the Object Manager under setup in Salesforce, then locate the object "Payment Txn", then click into the "Fields & Relationships" Tab. Locate the field and you should find the API Name.
To add a new value to the "Gateway Metadata" options, you need to go to setup in Salesforce, Select Object Manager, Locate and click into the Object "Merchant Facility", click on the "Fields & Relationships" Tab. Locate field "Gateway Metadata", click into (NOT edit), then add a new value to ALL RECORD types.
The above is provided as guidance. Should you need more assistance, then you'll need to select one of our premium support options.
How to enable Apple Pay with Stripe
Apple Pay is only available with the Payment Gateway "Stripe SCA". This is the Payment Gateway selected on the Merchant Facility.
You need to copy the Base Site URL from your Primary and Active "Merchant Facility". You will need this for steps later on in the setup process.
If the Base Site URL is blank, then see procedure: How to connect your new site to your Merchant Facility.

2. Enable Apple Pay Payment Method in Stripe
Log into your Stripe Dashboard, then to set up Apple Pay on your Stripe account for the first time, click on Settings > Payments > Payment methods tab > Apple Pay.
Navigate to: https://dashboard.stripe.com/settings/payment_methods for production or test at https://dashboard.stripe.com/test/settings/payment_methods and enable Apple Pay. Then Turn on (1)
NOTE: If testing, enable Test Mode before turning on (2).

3. Configure Apple Pay within Stripe Dashboard
1. Expand the Apple Pay section by clicking on >
2. Press Configure Domains Button
3. Press Add new domain button (1)

- Paste the "Base Site URL" as copied above.
Make sure the URL does NOT end with a \
Remove the "https:\\" at the start of the URL. - Press Add button
Note, you do NOT need to download certificate and upload anywhere.

Note: Also, if you have the subdomain populated on the Default Web Address for your site, please ensure that URL Rewriter Class is set to 'URLRewriter' and Payments2Us Sites permission is assigned to your guest user.
4. Configure IOS Certificates
1. Expand the Apple Pay section by clicking on >
2. Press “Configure IOS Certificates” Button

3. Press “Add new Application” Button (1)

4. Press “Continue” Button (1)

5. Click on the “this page” link to go to your Apple Developer Account. Log into your Apple Developer Account.

6. Press the “+” button next to Identifiers (1)

7. Select “Merchant Ids” (1) and then Continue button (2)

8. Key in a description, e.g. “Payments2Us” (1), then an identifier (follow the suggestion of your Site Base URL from the Merchant Facility in reverse order (2) and then press Continue button (3)

9. Press Register (1) Button
NOTE: This button creates a file in your download folder called “stripe.certSigningRequest”. You need this for the a following step. There is no alert of information provided in the register step, it just happens.

10. Click back into your App (1)

11. Press Create Certificate button (1)

12. Confirm if using in China or Not (1) and then press Continue button (2)

13. Upload Certification Identifier. Select Choose File (1), navigate to “Downloads” Folder (2), Select “stripe.certSigningRequest” file (3), Open button (4), then “Continue” button (5)

14. Download the Certificate

15. Back in Stripe, press “Continue” (1) button

16. Upload the Certificate (1), Select the certificate generated in the previous step that will be saved to your downloads folder (2) and press Open button (3). The press Submit (4) button.

Enable Apple Pay as a Payment Method on the Merchant Facility
In Salesforce, click on the Merchant Facility Tab, then into the Merchant Facility you wish to use Apple Pay with.
- Make sure the Payment Gateway is Stripe SCA (Apple Pay will not work with the "Stripe" Payment Gateway option)
- Enable Apple Pay and SAVE

Additional steps for Apply pay to work in Iframe
For Apple pay in an iframe please refer to the following article
How to enable Google Pay with Stripe
Google Pay is only available with the Payment Gateway "Stripe SCA". This is the Payment Gateway selected on the Merchant Facility.
1. Enable Google Pay Payment Method in Stripe
Log into your Stripe Dashboard, then to set up Google Pay on your Stripe account for the first time, click on Google Pay under Payments and Payouts in your Business Settings.
Navigate to: https://dashboard.stripe.com/settings/payment_methods for production or test at https://dashboard.stripe.com/test/settings/payment_methods and enable Google Pay. Then Turn on (1)
NOTE: If testing, enable Test Mode before turning on (2).
2. Enable Google Pay as a Payment Method on the Merchant Facility
In Salesforce, click on the Merchant Facility Tab, then into the Merchant Facility you wish to use Google Pay with.
- Make sure the Payment Gateway is Stripe SCA (Google Pay will not work with the "Stripe" Payment Gateway option)
- Enable Google Pay and SAVE

How to enable BECS Direct Debit (AU) with Stripe
⚠️BECS Direct Debit (AU) with Stripe and Payments2Us is currently not available. This is currently scheduled for version 9.5 and is currently undergoing testing.
Direct Debits (BECS) is only available with the Payment Gateway "Stripe SCA" and for Australia.
Stripe SCA is the Payment Gateway selected on the Merchant Facility.
1. Enable BECS Direct Debit (AU) Payment Method in Stripe
Log into your Stripe Dashboard, then to set up BECS Direct Debit (AU) .
Navigate to: https://dashboard.stripe.com/settings/payment_methods for production or test at https://dashboard.stripe.com/test/settings/payment_methods and enable BECS Direct Debit (AU). Then Turn on (1)
NOTE: If testing, enable Test Mode before turning on (2).

2. Setup Merchant Facility
2.1. Enable Direct Debit and BECS as a Payment Method on the Merchant Facility
In Salesforce, click on the Merchant Facility Tab, then into the Merchant Facility you wish to use BECS Direct Debit (AU) with.
- Make sure the Payment Gateway is Stripe SCA (Automated BECS Direct Debit will not work with the "Stripe" Payment Gateway option)
- Enable Direct Debit as a Payment Method
- Enable BECS in Payment Gateway Options

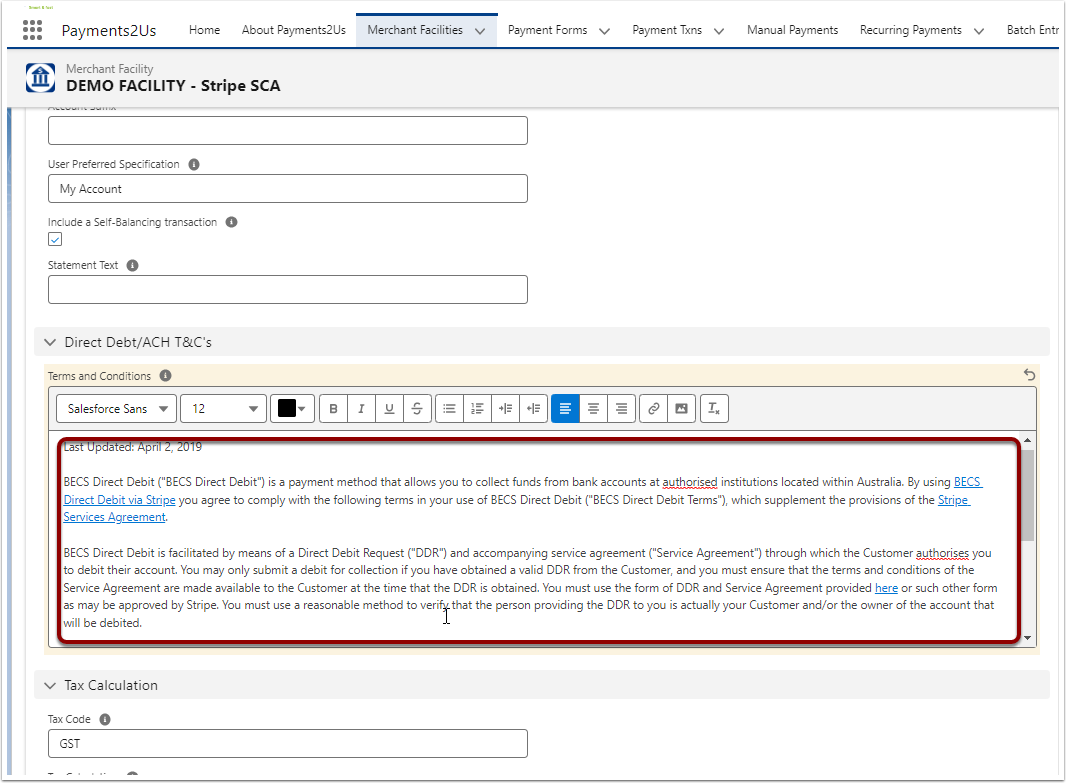
2.2. Update Terms and Conditions on Merchant Facility
Copy the Terms from https://stripe.com/au/legal/becs and paste into the Terms and Conditions on the Merchant Facility
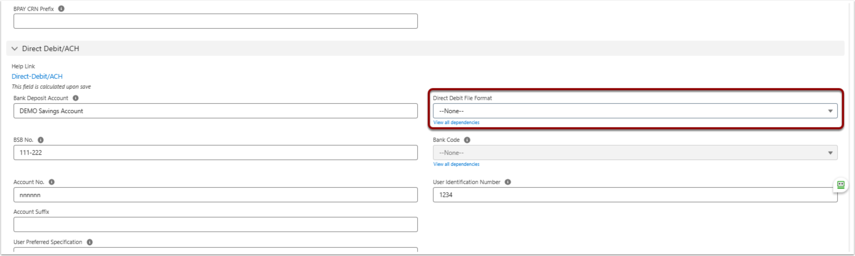
2.3. Set Direct Debit File Format
Make sure the Direct Debit File Format is set to blank
3. Refresh Payment Form and update Terms
Press Payment Form Builder button on the Payment Form

Press Full Reset button. This is required to pick up BECS Direct Debit (AU) specific text

The refresh adds required text to the checkout form. This text can be seen by:
- Clicking on “>” next to My Payment Details
- Clicking on Pencil Icon next to Direct Debit
- Clicking on Pencil Icon next to Text

4. Enable Service Agreement Send
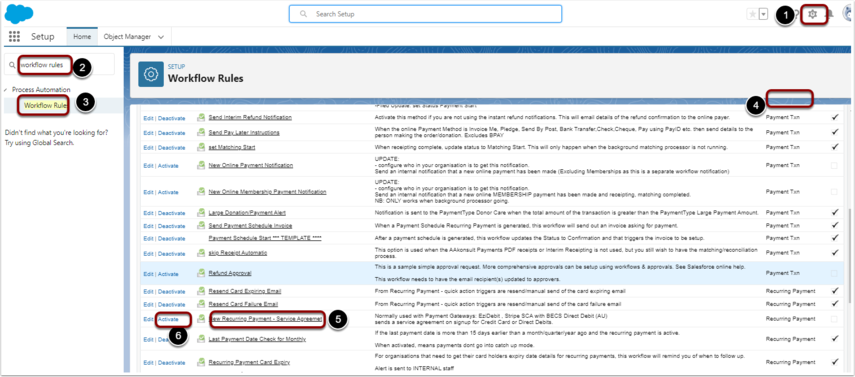
Navigate to and activate workflow rule:
- Click on setup cog (top right)
- Quick find "workflow rules"
- Click on menu item "Workflow Rules". Then, when screen refreshes:
- Sort by Object (not shown).
- Locate workflow rule "New Recurring Payment - Service Agreement". Note, this is against the "Recurring Payment" object
- Click Activate to enable