Overview
Payments2Us on your public website will create an update the custom object Payment Txn inside your instance of Salesforce. When creating or updating these records, it is associated with a Salesforce user. This user will have the permissions assigned to them that has the appropriate level of access to perform all of the operations required.
This procedure takes you through the necessary steps to associate the Salesforce user with the Payments2Us App.
1. Assign Payments2Us Admin permission set
The user that is logged in is the one that will be assigned to the Payments2Us App.
Make sure the logged in user has the "Payments2Us Admin Users" permission set assigned to them, See procedure: How to set up internal security (Salesforce users), this link will guide through two options:
- Assigning permission sets to users - For a Multiple Users
- Assigning permission sets to users - For a Single User
2. Create a Primary Active Merchant Facility
Before you can authorise Payments2Us App, you need to have a Primary and Active Merchant Facility.
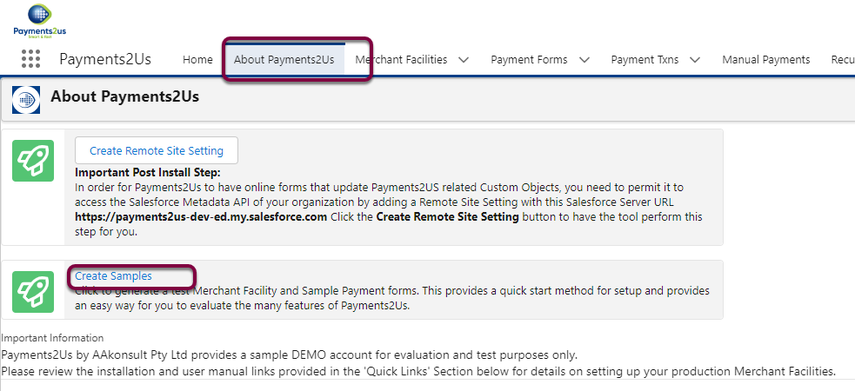
The quickest and best way of setting up a Merchant Facility is to go to the About Payments2Us Tab, then press the "Create Samples" link.
NOTE: Before pressing Create Samples, It is optional, but recommended that you check that you have the "Marketing User" checkbox selected on your User record (setup > users - locate your user and edit). If you do not have Marketing User access setup, then an error message may be generated by the Create Samples process.
If you get errors with this step, please checkout the Setup and Installation - FAQ guide
3. Create Remote Site Setting - Automatically
This step works best if you have My Domain enabled. If you do not have My Domain enabled, we recommend doing so before continuing.
To see if you have, or to enable My Domain, navigate to setup > Search "My Domain" - click into My Domain. If you need more help on My Domain, please checkout the Salesforce online guides or contact Salesforce support.
This procedure is required for the first time you install/setup Payments2Us. Should you be re-Authorising the App at a later stage, you can skip this step and move onto Step 5 - Authorise Payments2Us
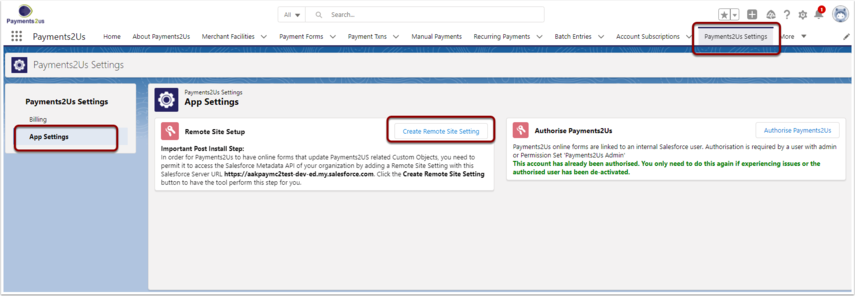
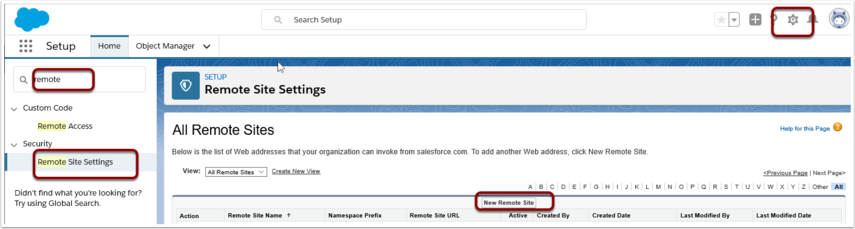
This step is required to setup permissions so the "Authorise Payments2Us" step can be completed. This adds a new entry in setup > [Search "Remote Site Settings"] - "
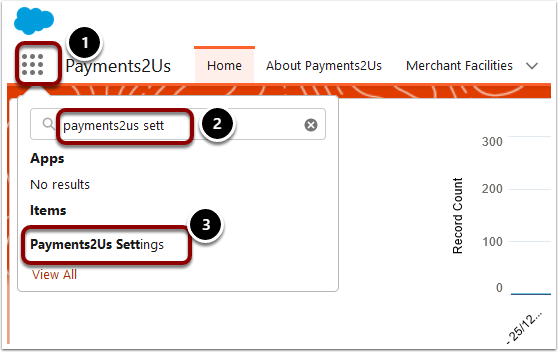
To complete this step, simply navigate to the "Payments2Us Settings" tab, App Settings and press the "Create Remote Site Setting" button. If section with the "Create Remote Site Setting" button does not appear, then it has already been completed, or is not required.
Should the "Create Remote Site Settings" button not appear, then this has already been setup for your Salesforce instance. You can continue to the "Authorise Payments2Us" step.
If you press the "Create Remote Site Settings" button and nothing appears to happen, then:
- Go to setup - Remote Site Settings". See if there is an entry for "Payments2UsSFDCInternal....". If there is, then this step was actually successful, but a setting in Salesforce has prevented us from confirming. You can move onto Section 5 - Authorising Payments2Us.
- Disable Lock sessions to the IP address from which they originated" option in the Setup > Session Settings.
After changing this setting, you need to log out using the "logout" menu option. Then close the browser and re login before re-attempting to create the Remote Site.
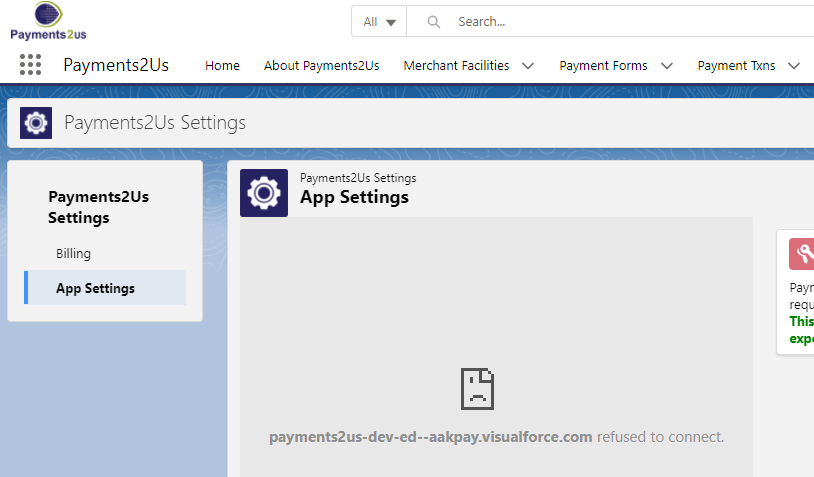
Should you observe the refused to connect/ broken image, please see the procedure App Settings shows Broken/Unable to connect icon.
4. Create Remote Site Setting - Manually
Note: If you do not receive this error, you do not need to complete this step. Go to Authorise Payments2Us Step.
Should you receive an "Unauthorized endpoint...." error as shown below, then copy the URL Shown and use this for the creation of the remote sites following steps.
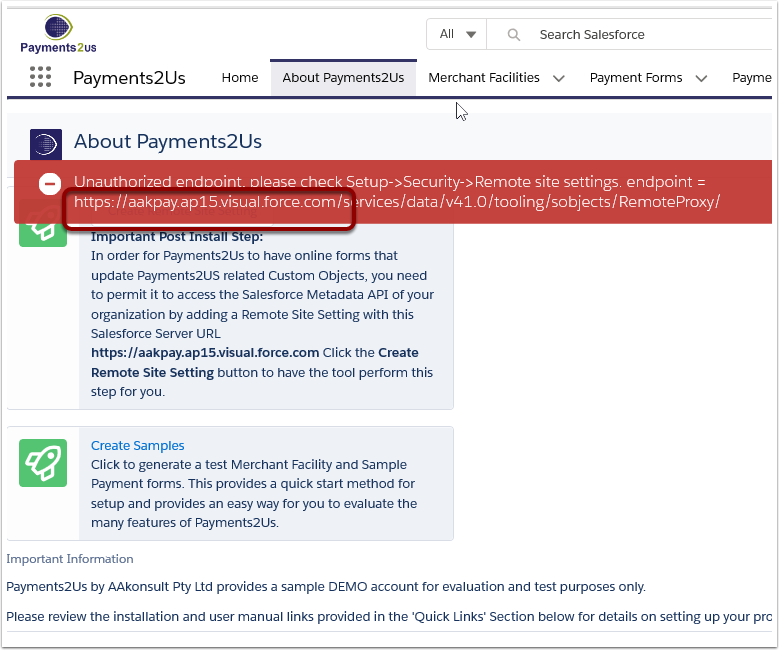
- Click on setup
- Search for "Remote Site Settings"
- Click on "Remote Site Settings"
- Press New Remote Site button
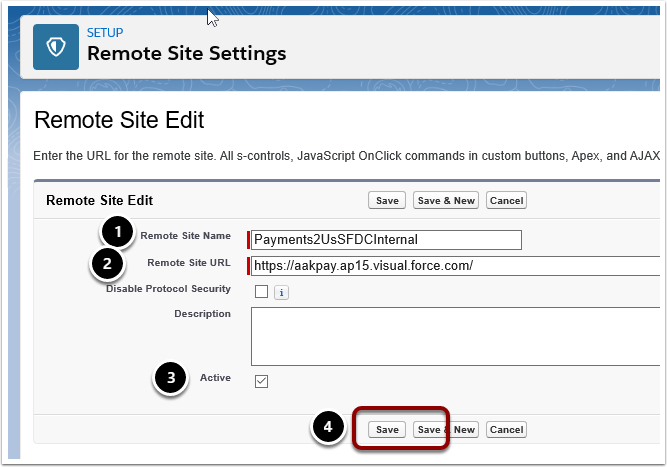
- Enter name of "Payments2UsSFDCInternal"
- Paste the URL that was copied from the error message above
- Ensure Active is selected
- Save
5.1. Create Samples
If you did not do step "Create a Primary Active Merchant Facility", then please do that now. If you have not completed this step, the "Authorise Payments2Us" button will not appear.
A Salesforce administrator should be the user that Authorises Payments2us. Navigate to the Payments2Us Settings Tab.
Only, if you cannot locate this menu option by searching, then ensure you have "Payments2Us Finance User" permission set assigned to your user profile. If you are not able to do this procedure, ask your Salesforce administrator to assist.
Press the "Authorise Payment2Us" button. Please check below screenshot.
If you are prompted for a username or password, then enter your current username and password.
If the "Authorize Payments2Us" button does not appear.
Go to the "About Payments2Us" Tab - Press "Create Samples".
Should the "Create Samples" button not appear on the About Payments2Us Tab, then delete or rename DEMO FACILITY on the Merchant Facility Tab, then retry the create samples.

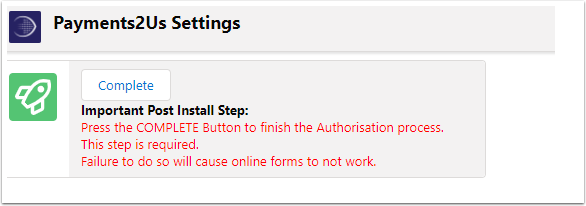
Press the "Complete" button to finalise the Authorisation.
You must press the Complete button in order for some final updates to occur. This step is required, so please do not ignore or navigate away.