1. Create your success/confirmation page
If you are wanting to create your own Success Page, you'll need to create your own HTML page. If your are iframing in the Payments2Us form, then the success/confirmation page being forwarded to will also be iframed in.
If you wish to make the success page a full website page, then speak to your web developer about iframe breakouts (This is not covered by Payments2Us support as it is a website developer role).
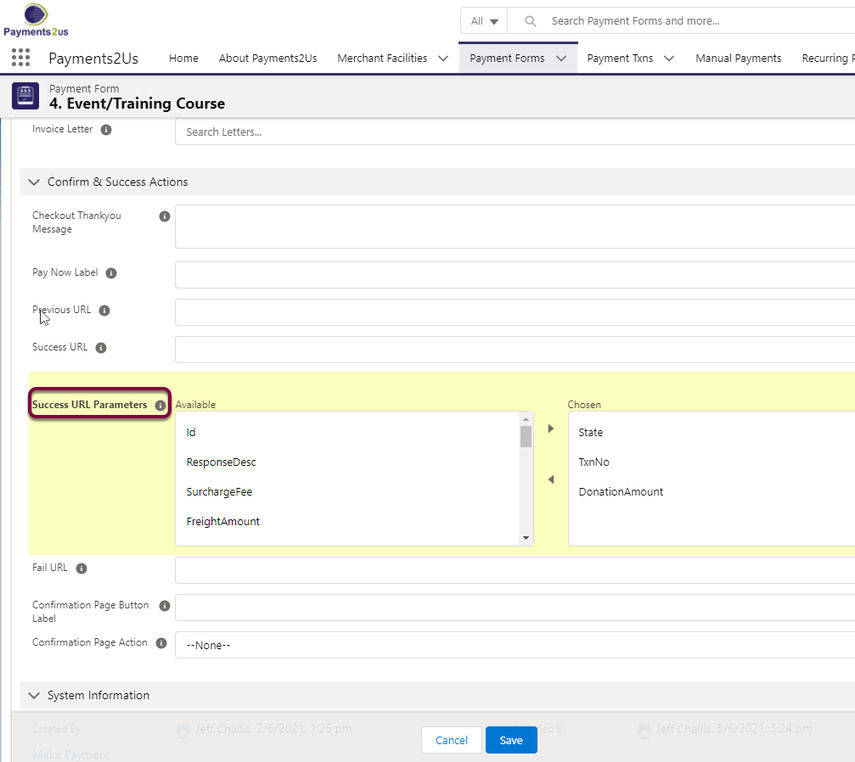
If you wish to show details from the payment that has been completed, then the following are passed to the Success Page as URL parameters:
- Id - Payment Txn Id (Note: the received parameter for this is 'id')
- TxnNo - Payment Confirmation Number from the Payment Gateway
- ResponseDesc - This is the success/failure message from the payment gateway
- SurchargeFee - The amount of the Credit Card Surcharge fee charged
- FreightAmount - Freight Amount
- TaxAmount - Tax Amount
- DonationAmount - Donation Amount. This will equal the Total Amount when the Payment Form - Payment Type field is set to Donation. For other Payment Forms, this will only contain a value if enable donation with is selected.
- TotalAmount - Total amount of the transaction including all freight, taxes, surcharges, discounts etc.
For the Checkout Modern forms, the following additional parameters are available:
- FirstName
- LastName
- OppId - Opportunity Record Id. Note, this is only available if the Opportunity Record Id was passed in to the original checkout form using URL Parameters or URL Tokens.
- customField[1,2,3...10]Value as passed in from URL Parameters (NOTE, for customField[1..10]Value to show on the success page, the corresponding customField[1..10]Name must be used on checkout URL parameter.
NOTE: customField[1,2,3...10]Name/Values can be used to set custom fields on the Payment Txn. The values passed into the checkout form will be passed to the success page. The primary use case for these fields are to pass into the checkout form details such as source (website/Facebook) etc. and then pass those onto the success URL. This canNOT be used to pick up values/formula fields from the Payment Txn Object. - City
- State
- PostalCode
- Country
See here for more information on URL Parameters .
Often organisations want to track campaign successes using google analytics. Please speak with your website developer about embedding this into the Success Page.
2. How to control which parameters are shown in the Success URL
Some SEO techniques will have issues if any personally identifiable information is passed into the Success URL. You can avoid this issue be only passing in details that are needed.
On the Payment Form, field "Success URL Parameters" in the "Confirm & Success Actions" section.
3. Link the completion/success page to your custom page
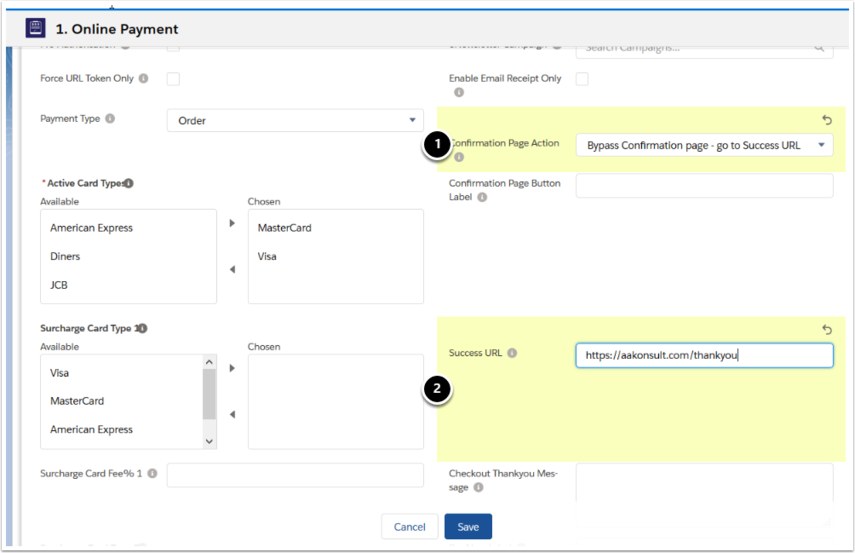
On your Payment Form (related tot the Merchant Facility) in Salesforce, update the "Confirmation Page Action" (1) to:
- Bypass Confirmation Page - go to Success URL : If this is selected, the standard Payments2Us Confirmation page is NOT shown and after a successful payment the page is redirected to the URL in "Success URL" field.
- Bypass Confirmation page - go to Success URL TOP: If this is selected, the standard Payments2Us Confirmation page is NOT shown and after a successful payment the page is redirected to the URL in "Success URL" field. If the Payment Form is embedded in a iFrame, then the success page will be the top level (full web page and not still iFrame embedded).
- Button on Confirmation Page - go to Success URL : This this option is selected, then the confirmation page from Payments2Us is shown. A button appears on this page with the label in field "Confirmation Page Button Label". When the users presses this, they are taken to the URL in "Success URL" field.
Note: Make sure you put in the full site url eg: https://www.example.org.au not just example.org.au