1. Event form customisation overview
Payments2Us Events Module allows for 10 different layouts to be used. When you setup a Payment Form for an event, you select which layout you wish to use. For example, you could use:
- 01 Layout for training courses
- 02 Layout for breakfast events (You can add extra fields such as dietary requirements)
- 03 Layout for a team event (eg. Golf event can have extra fields for handy cap etc.)
- 04 .. 10 for other layouts
Layouts are available so that you can customize the field set as per your requirements. You can then add extra fields such as Dietary requirements, Table request, etc but these field needs to be added on the payment txn object to record the data.
Payments2Us Events has made extensive use of FieldSets. This provides organisations with a lot of flexibility into the information captured or displayed.Some key Fieldsets that used are:
To cater for the 10 different possible layouts, there are 10 FieldSets for each component of the form that uses a field set. Each of these fieldsets end with a number from 01 to 10.
If for example "02" is selected on the Payment Form - "Event FieldSet Layout" setting, then all fieldsets ending with 02 are used.
A list of FieldSets used by the AAkonsult Payment module and the object where they can be found are:
Campaigns
- (A) eventCalendarPopup[01..10]. This is shows the fields on the calendar when clicking on an event or overing over it.
- (B) eventWhenWhere[01..10]. Shown on the sidebar section “When and Where”
- (C) eventContactUs[01..10]. Shown on the sidebar section “Contact Us”
- (D) eventUpcomingHeader[01..10]. Shown in upcoming events in the date/left hand side section.
- (E) eventUpcomingDetail[01..10]. Shown in upcoming events in the details/right hand side section.
Payment Txn
- (F) eventPrimaryContactRegistration[01..10]. Shown on the first (primary) ticket purchaser/registration screen.
Payment Items
- (G) eventAttendeeContactRegistration[01..10]. When shown, used on the second registration page where the individual attendees register.
- (H) eventAttendeeSummaryHeading[01..10]. When shown, used on the second registration page to show a summary table of persons that have been entered.
Go to Salesforce online training to learn more about FieldSets
2. Setting Which FieldSet number to use
2.1. Locate the Merchant Facility

Navigate to the Merchant Facility
The Merchant Facility tab can be found within the Payments2Us menu (Top right picklist in Salesforce - Select Payments2Us), or it can be found under the "More" at the end of the tabs. (In Salesforce Classic - It can be under the "+" at the end of the tabs)
Once you have clicked on the Merchant Facility Tab, select the appropriate List view (Example - "All Merchant Facilities") and click into Merchant Facility you wish to update.
2.2. Select Payment Form and Click into ‘Online Payment’
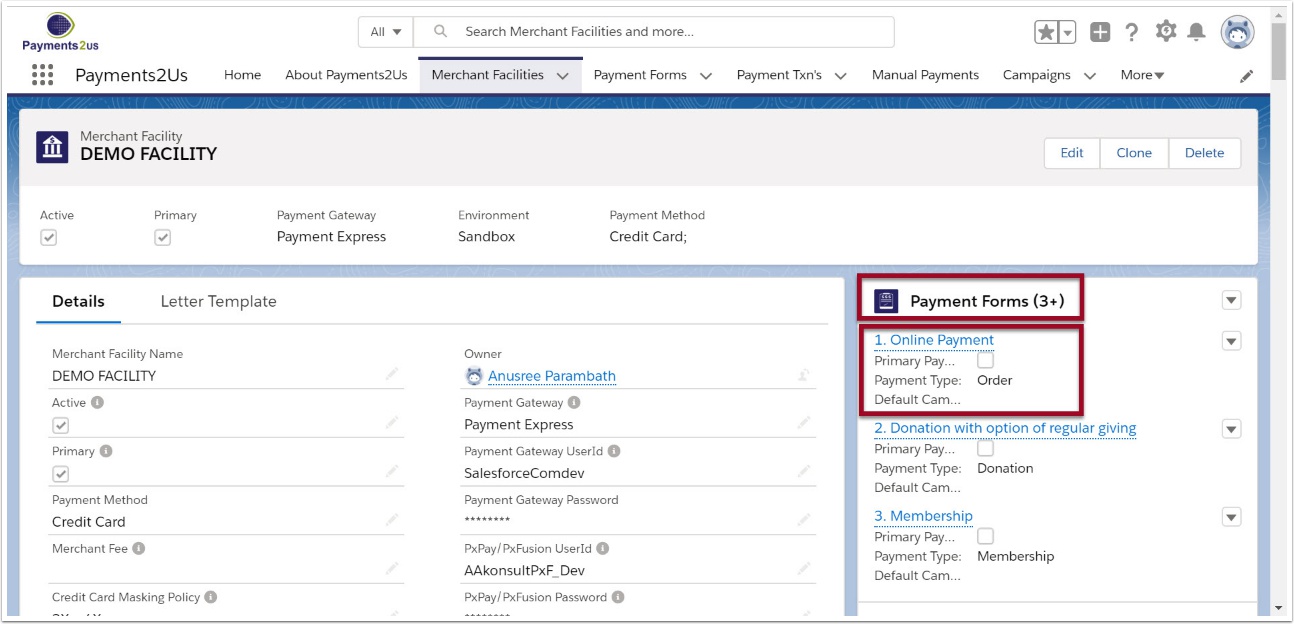
2.3. In Payment Form update Event FieldSet Layout

- Scroll down the form to the Events Section
- In Event FieldSet Layout select a number between 01 and 10. If no number is selected then 01 is assumed.
3. Determining Which FieldSet to update
When looking at which fieldset is to be updated, you need to think about where the information is shown that needs to be updated.
The following sections show the screenshot and point to the Object where the fieldset is located and the name of the fieldset.
3.1. Calendar
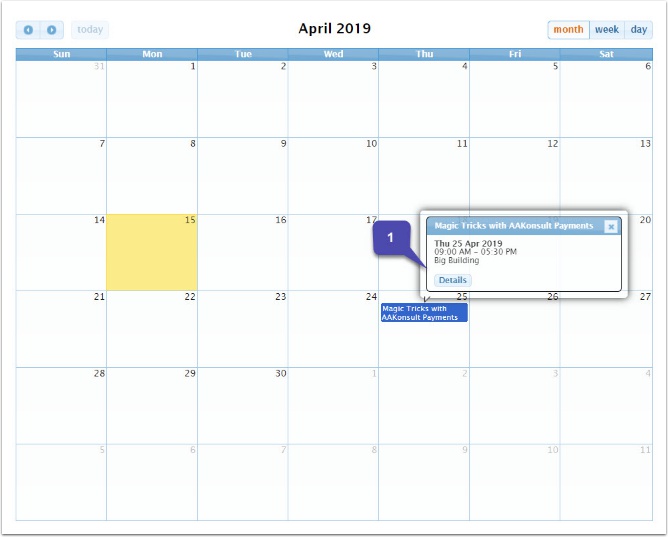
The following FieldSets are used on the Calendar view:
Campaign
- eventCalendarPopup[01..10] - This is shown when hovering over the event.
3.2. Upcoming Events

The following FieldSets are used on the Upcoming Events view:
Campaign
- eventUpcomingHeader[01..10] - The date section
- eventUpcomingDetail[01..10] - The event detail section
3.3. Ticket Purchase
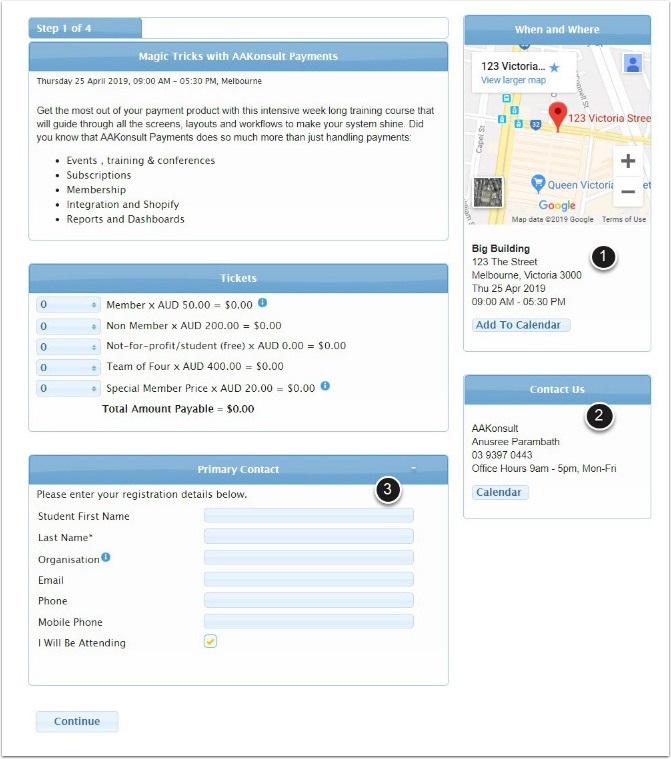
The following FieldSets are used on the Event Tickets view:
Campaigns
- eventWhenWhere[01..10]. Shown on the sidebar section “When and Where”
- eventContactUs[01..10]. Shown on the sidebar section “Contact Us”
Payment Txn - eventPrimaryContactRegistration[01..10]. Shown on the first (primary) ticket purchaser/registration screen.
3.4. Registration
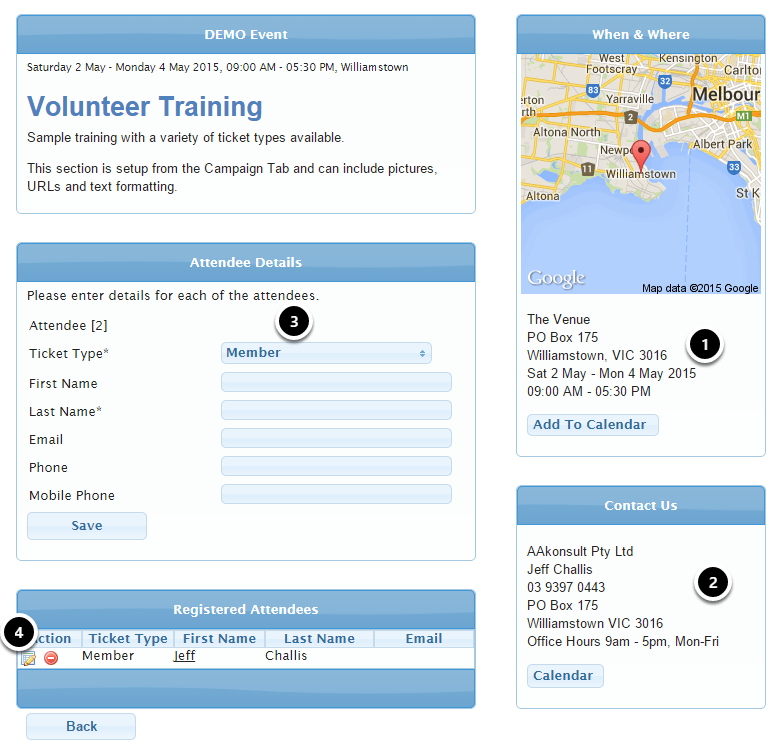
The following FieldSets are used on the Upcoming Events view:
Campaigns
(1) eventWhenWhere[01..10]. Shown on the sidebar section “When and Where”
(2) eventContactUs[01..10]. Shown on the sidebar section “Contact Us”
Payment Items
(3) eventAttendeeContactRegistration[01..10]. When shown, used on the second registration page where the individual attendees register.
(4) eventAttendeeSummaryHeading[01..10]. When shown, used on the second registration page to show a summary table of persons that have been entered.
4. Changing FieldSet Layouts
Now that you have the FieldSet name and the object (Campaign, Payment Txn, Payment Item) it is related to, you can now amend the FieldSet.
4.1. Changing FieldSet Layouts - Campaigns
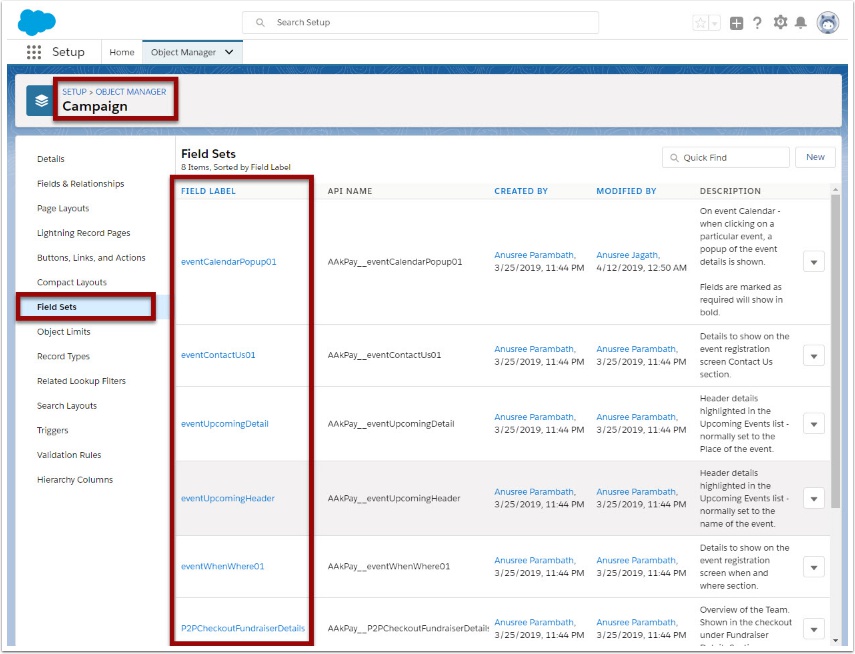
- Navigate to Setup > Object Manager > Campaigns > Field Sets
- Click into the Field Set you wish to Amend
4.2. Changing FieldSet Layouts - Campaigns Layout
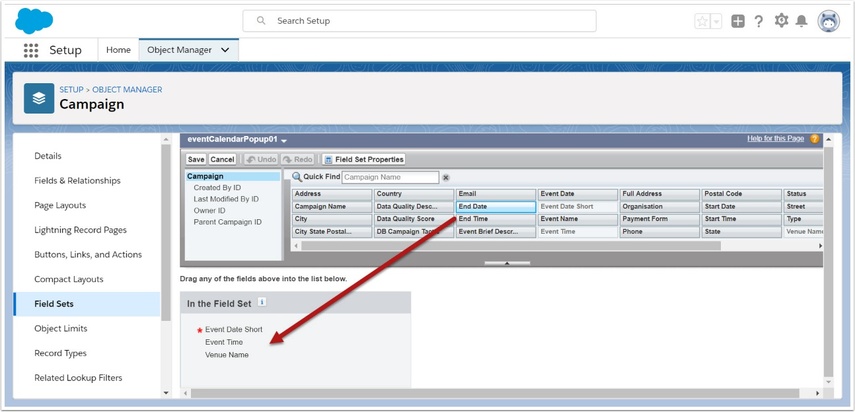
You can now:
- drag / drop fields onto/remove from the FieldSet
- rearrange the order
- double click to set if the field is required or not
If you have added a custom field to the Campaign Object, then you can also include this in the form. Be sure to set the field level security so it is publically accessible - see How to make a custom field visible on public web forms
4.3. Changing FieldSet Layouts - Payment Txn, Payment Item
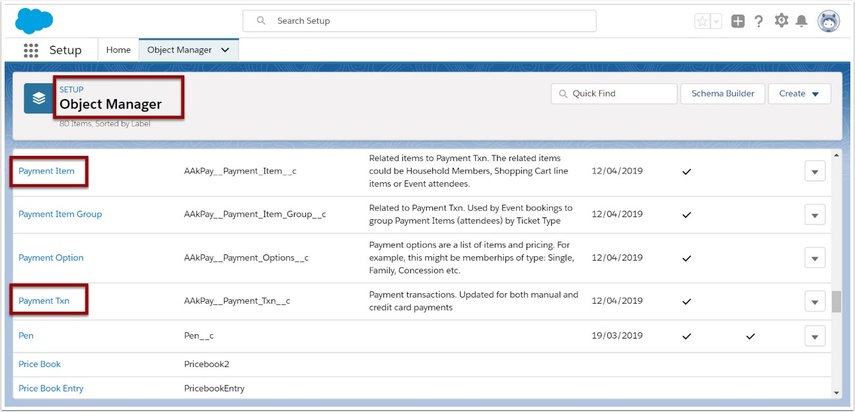
- Navigate to setup > Object Manager (Payment Txn or Payment Item)
4.4. Changing FieldSet Layouts - Payment Txn, Payment Item FieldSet

- Select the "Field Sets" section
- Click into the FieldSet you wish to edit
4.5. Changing FieldSet Layouts - Payment Txn, Payment Item Layout

You can now:
- drag / drop fields onto/remove from the FieldSet
- rearrange the order
- double click to set if the field is required or not
If you have added a custom field to the Campaign Object, then you can also include this in the form. Be sure to set the field level security so it is publically accessible - see How to make a custom field visible on public web forms
NOTE : After adding Fields to the Field set, make sure you Refresh the Payment form from Payment Form Builder
Then add the fields to the form ( to desired section) via the Payment form builder